In our previous blog we covered using two of the ICT library AOIs that form the backbone of most MagneMotion applications.
In this blog we are going to cover alternative methods for controlling how vehicles move along your MagneMotion track using utilities found in the ICT library (You can find the ICT Library here).
MagneMotion Guide Series
Step 1: Using the MPM AOI
While the Station AOI is typically how you should route vehicles, the MPM AOI is actually the simplest way to have a PLC move a MagneMotion vehicle.
A call of the MPM AOI sends a position command to the Node Controllers to move a particular vehicle to a specified position on the track. Conversely, the Station AOI sends position commands to move particular vehicles to specified positions with some additional handling logic to facilitate moving vehicles between several commonly used positions, along with some additional checking to determine when a vehicle reaches a station.
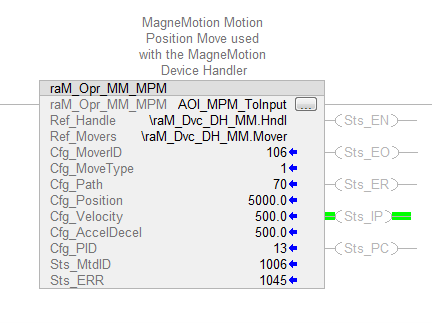
Like the Station and Path AOIs from the previous blog, the MPM AOI requires inputs from the \raM_Dvc_DH_MM program that was imported from the ICT Library.
The MPM AOI also needs the following information along with the Handler and Mover tags:
• Cfg_MoverID: The ID of the vehicle you wish to move.
• Cfg_MoveType: The direction vehicles take when leaving the station to go to their next destination: 0 = Shortest Direction, 1 = Positive Direction, 2 = Negative Direction (It is usually a good idea to use Positive or Negative direction to make your station more predictable and avoid traffic issues.)
• Cfg_Path: The ID of the path you want to move the vehicle to.
• Cfg_Position: The distance in mm from the start of the path that you want to move the vehicle to.
• Cfg_Velocity: The speed in mm/s that you want to move the vehicle.
• Cfg_AccelDecel: The acceleration in mm/s^2 for the vehicle.
• Cfg_PID: This will determine which PID settings the vehicle uses to move if you defined separate PID controls in the configuration file.
Once the MPM AOI is called, it will trigger the vehicle to move to the desired position and the output status Sts_IP will go high for the duration of the move. When the move completes, Sts_IP will go low and be replaced with Sts_PC to indicate that the move has finished.
One important thing to note is that if a vehicle is re-routed before it reaches its destination (ex. You redirect the mover to a station after it has begun its move) the MPM AOI will throw an error. However, this doesn’t indicate a problem in your code, it’s just an indication that the vehicle was not able to complete the move that the MPM AOI commanded it to do.
While most of your system’s routing should be handled by the Station AOIs, the MPM AOI is valuable for filling in any gaps in routing that the Station AOI doesn’t cover.
Step 2: Changing Vehicle Destination on the Fly
When designing your system, it’s entirely possible that you will want to redirect a vehicle that is already headed to a particular position or station. Maybe you want a button that will send all vehicles to some sort of home position no matter what. Or maybe you want to be able to divert incoming vehicles to a different route if your code detects a potential traffic jam. Or maybe you just think it would look cool if vehicles didn’t have to stop at certain stations before going to their next destinations.
On the surface, changing vehicle destinations mid-move is pretty simple, you can change the TargetID of the vehicle in the Mover array in the ICT library raM_Dvc_DH_MM program.

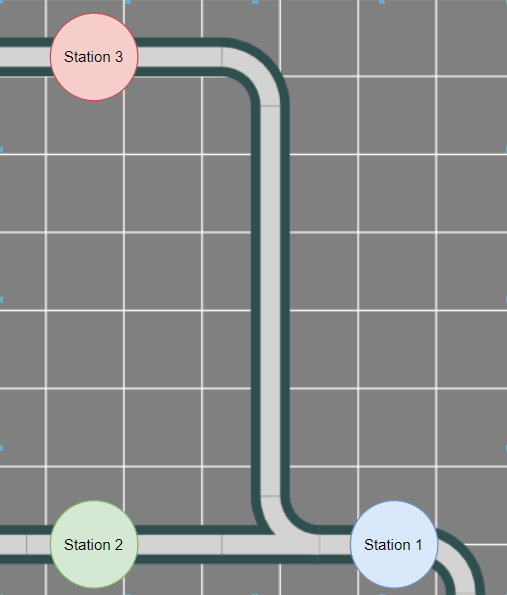
You can update the TargetID of Mover 3 to Station 4 from Station 3 and the Mover will update its destination and redirect itself to Station 4. Similarly, you could trigger an MPM AOI call to redirect Mover 3 to an entirely different position. However, redirecting vehicles like this comes with some additional risks and considerations.
The first thing to note is that the Node Controllers will not allow for changing the speed or acceleration of a vehicle while it is already moving. Sending an MPM command to a moving vehicle that has a different acceleration than the vehicle’s current acceleration will often result in the vehicle being labeled “Suspect” and unable to move.
Another important thing to consider is that when you command a vehicle to go from Station A to Station B ,the vehicle’s acceleration, velocity, and move type come from Station A’s parameters. This means that if you want to change these parameters for a vehicle you should do so while the vehicle is stopped at a station.
The final thing to consider before redirecting a vehicle mid-move is that it can increase the likelihood that you will command a vehicle to perform a move that is impossible for it to finish, or one that will result in a traffic jam.
For example, if you try to redirect a vehicle that is going to Station 2 to Station 3, it’s possible that the vehicle will have already passed the point of no return and will have no valid path to reach Station 3 when it is redirected. This will cause the vehicle to stop at Station 2 without Station 2 registering that there is a vehicle there, which will cause Station 3 to fault out.
Similarly, if you command a vehicle to go from Station 1 to Station 2 in the positive direction, when you try to move that same vehicle back to Station 1 it will be unable to complete the move since it will be going in the wrong direction.
Step 3: Controlling Vehicles Through Nodes
Since it is fairly easy to cause problems when redirecting moving vehicles, the question that arises is: what is a good way to tell when it is ok to redirect a vehicle to a different station? Of course, there is no single answer to this question, each system has its own quirks and needs. While it is possible to monitor the path and position status of every vehicle and make decisions based on that, those calculations can get intensive in terms of how long they take to program and the amount of PLC resources they take up. One method that is often useful in determining what to do with a moving vehicle is monitoring the status of a node.
In the MMI_node_status tag you can find a status returned from the Node Controller of which vehicle is currently passing through that node.
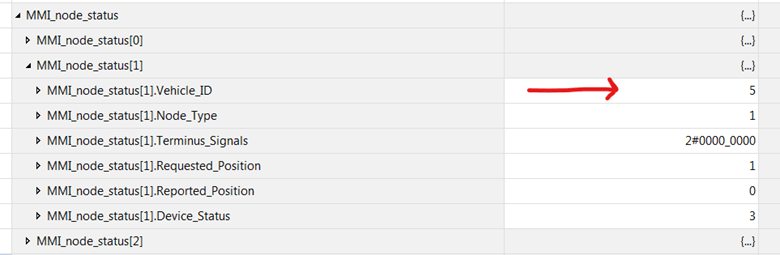
This Vehicle_ID value will be 0 when there is no vehicle in the node and will match the ID of the vehicle passing through the node until that vehicle has fully passed through.
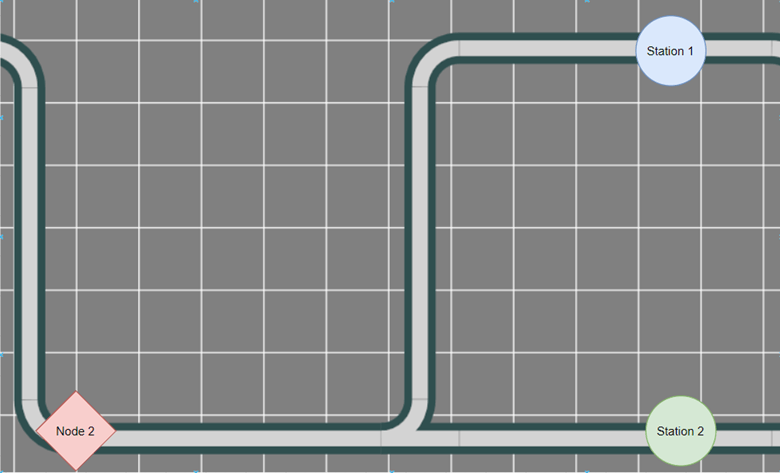
Say for example you wanted to redirect any vehicles that were about to reach Station 1 to Station 2 (maybe because Station 1 already had several vehicles queue up at it, or it was temporarily disabled). By monitoring Node 2’s status, we can see which vehicles are on the way and modify their target station when they are in a controlled position to make sure we can redirect any incoming movers without causing any issues with our system.
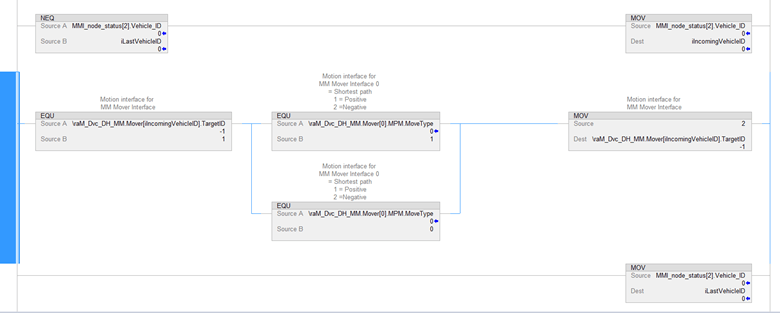
The above snippet of code will monitor any vehicles passing through Node 2. If it sees a vehicle heading to Station 1, it will verify that it has the correct move type to go to Station 2 and then update its target ID to redirect it. This is a fairly simple robust way to redirect vehicles in a way that we know will not fault out Station 2 or lead to a vehicle being stuck on the track.
Topics to look forward to in this series:
Learn more about DMC's MagneMotion expertise and contact us to get started on your next project.